This is a community-created guide, not official, not corporate, just here to help new folks get oriented and get comfortable faster.
Gander Social is a Canadian-built social platform focused on Canadian conversation, civic literacy, and community-first interaction. It is currently in a closed BETA.
If you want the official corporate overview, you can read more at:
https://gandersocial.ca/
This guide is about how to actually use it well. And for those not on the BETA, get a look at what’s going on under the hood.
Link to the Unofficial Community Guide


This based on Release 1.0.1 (109)
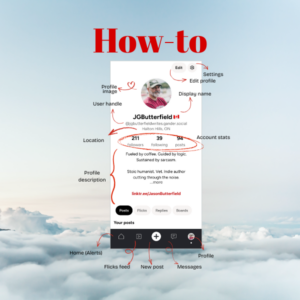
Understanding Your Gander Profile Page
This should look familiar if you’ve used other social platforms, but we’ll run through it quickly so you know how it works on Gander.
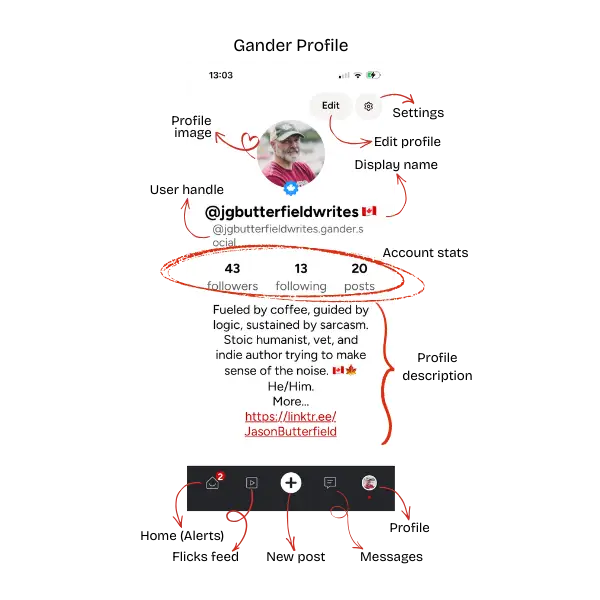
Profile Image
This is your visual identity. Be sure to use:
- A clear headshot (best for trust and conversation)
- Or a clean brand/logo image (if you’re building a creator presence)
On a growing platform like Gander Social, recognizability builds faster than anonymity.
Display Name
This is your readable name, not your handle (more on that later). You can change this at anytime so you’re not stuck with it forever.
- Use your real name, pen name, or consistent brand identity.
- Keep it searchable.
- Avoid clutter or excessive symbols (I mean unless you feel like adding some flare).
Username / Handle
This is your unique identifier. This is what people tag, search, and remember. This is your @username, your permanent identity on Gander. Best practice:
- Keep it consistent across platforms if possible.
- Avoid random numbers unless intentional branding.
Choose your @handle carefully. You can change it later, but after you’ve built visibility, switching it can disrupt how people find and tag you.
Account Stats
This is your activity snapshot. Like on many other social platforms this keeps track of your social network.
- Followers = Who finds value in what you say
- Following = Who you’re learning from
- Posts = Your contribution footprint
Early-stage platforms reward contribution. Posting thoughtfully matters more than chasing numbers. Those will come.
Edit Profile (Top Right)
This is where you:
- Update photo
- Change bio
- Adjust display name
Expect your profile to evolve as your voice on the platform sharpens.
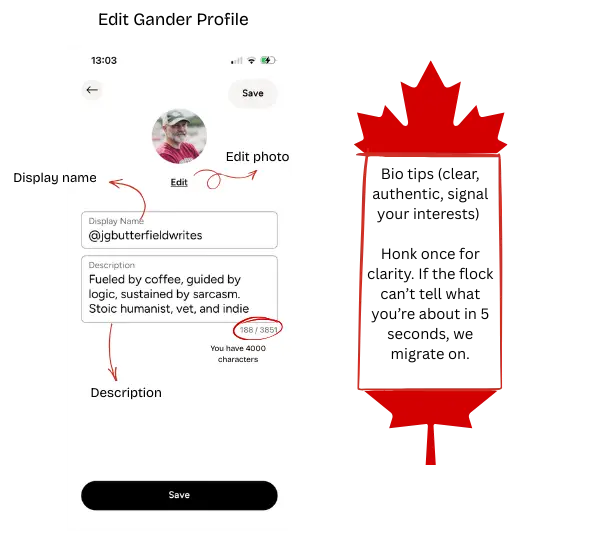
Bio Description Section
Your positioning statement. This is where you:
- Signal your interests
- Set tone
- Help the right flock land
Use clear beats, be clever, show us who you are and why we would want to follow or have you in our flock of influence. You have up to 4000 characters, but I would try to keep it succinct. Use emojis and hyperlink are permitted. I’ve added a link to my Linktree for more information.
Bottom Navigation Bar
From left to right:
- Home feed – click this to take you to the main Gander page. You may see a number if you have notifications.
- Create a post (see below)
- Messages / Interactions
- Profile access – this will take you back to your profile page.
Learn this layout early, it speeds up everything.
Settings
These screens are where you manage your identity, your data, and your experience on Gander Social. New users should review these early, not after something goes wrong.
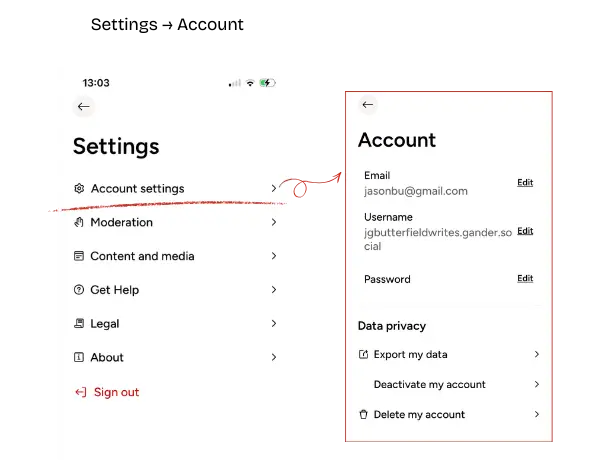
Account Settings
This is your control panel for identity and security. Here you can update:
- Email – Make sure this is current. It’s your recovery anchor.
- Username (@handle) – Your unique address on the platform.
- Password – Keep it strong and unique.
Under Data Privacy, you’ll also find:
- Export my data – Allows you to download your information. This supports transparency and portability.
- Deactivate my account – Temporarily step away without fully deleting your presence.
- Delete my account – Permanent removal.
This section matters because platforms evolve, and so do users. Having access to your data and knowing your exit options builds trust in the system.
Take five minutes here when you join. It’s worth it.
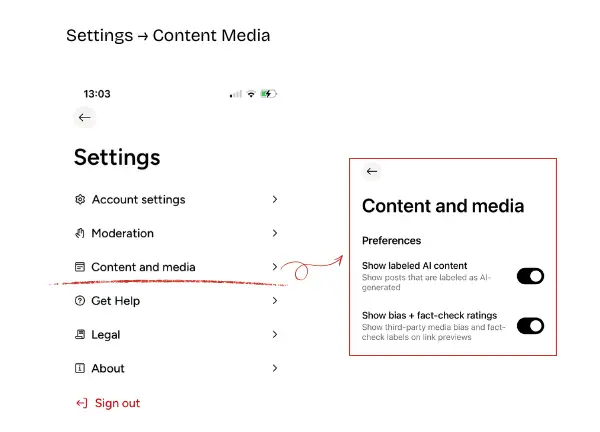
Content and Media – Transparency Settings
This screen includes the “How was this made?” option when creating posts.
You can indicate whether your content is:
- Human-made
- AI-generated
This is not about policing creativity. It’s about signalling transparency.
As generative tools become more common, clarity around authorship helps maintain credibility and informed engagement. If you use AI assistance, be open about it. If you don’t, that’s fine too.
The important part is intentional disclosure.
Early culture norms around transparency often shape long-term trust. This setting supports that.
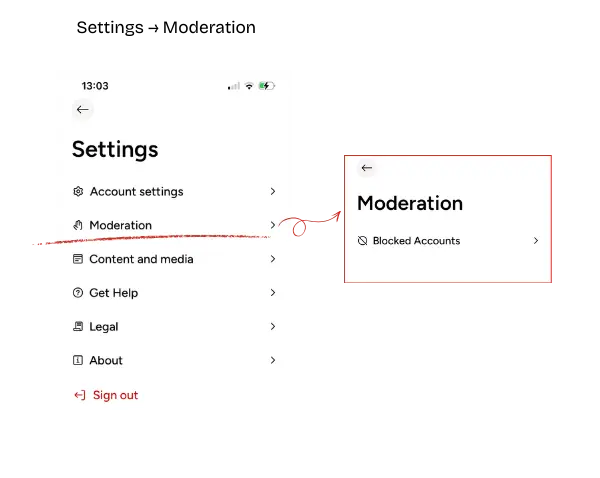
Moderation – Your Personal Boundaries
This is where you manage Blocked Accounts.
If someone:
- Harasses
- Spams
- Repeatedly engages in bad faith
- Or simply disrupts your experience
You can block them.
Blocking isn’t dramatic. It’s digital boundary-setting.
On smaller platforms especially, maintaining a healthy environment matters. Curating your space helps maintain signal over noise.
You’re not required to debate everyone. You’re not required to host chaos. Moderation tools exist so you can stay focused on constructive engagement.
Understanding Posts, and Comments
Once your profile is set up, this is where the real interaction happens on Gander Social.
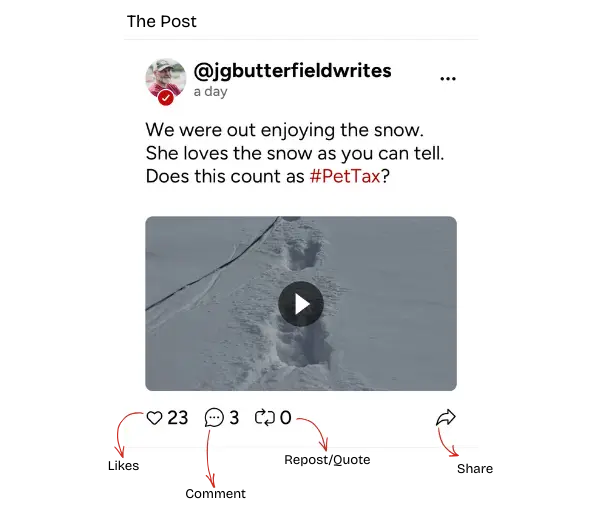
The Post Interface (Engagement Controls)
At the bottom of each post, you’ll see engagement icons:
- Like – A lightweight way to signal appreciation or agreement.
- Comment – Opens the conversation thread.
- Repost / Share – Amplifies the post to your followers.
- Share – Sends or distributes the post externally.
You are probably used to these types of buttons on other similar social media platforms.
On smaller platforms especially:
- Thoughtful comments often matter more than passive likes.
- Reposts amplify posts, use them intentionally.
- Engagement builds relational equity.
If you want to grow on Gander, reply more than you broadcast. Use all the features and functionality to get used to how they work and also test the platform. That’s why we are here. It’s a Beta.
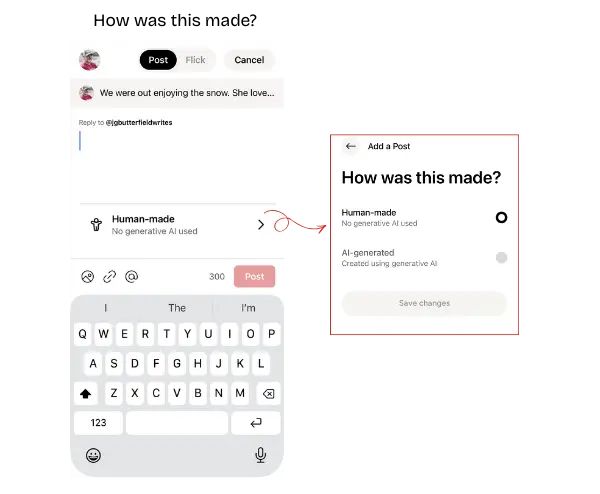
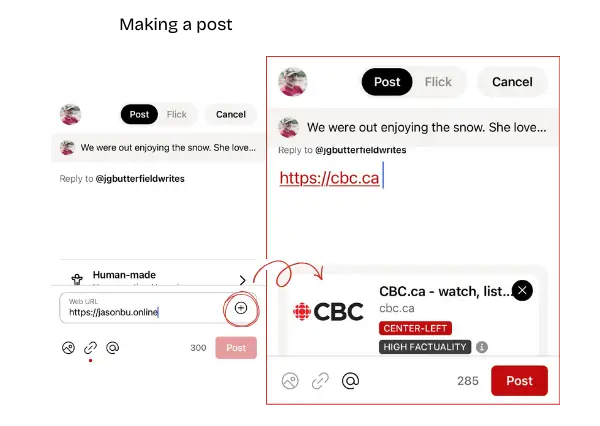
Creating a Post – “How Was This Made?”
When drafting a post, you’ll see the transparency option:
- Human-made
No generative AI used. - AI-generated
Created using generative AI tools.
This is a culture-setting feature and one of the first “tags”. Sounds like there will be others like location.
It’s not about limiting creativity. It’s about signalling authorship clearly so readers understand context.
As generative tools become common, transparency helps preserve trust. If you used AI assistance, say so. If not, mark it human-made.
Clarity avoids confusion later.
The small act of disclosure strengthens the overall community standard.
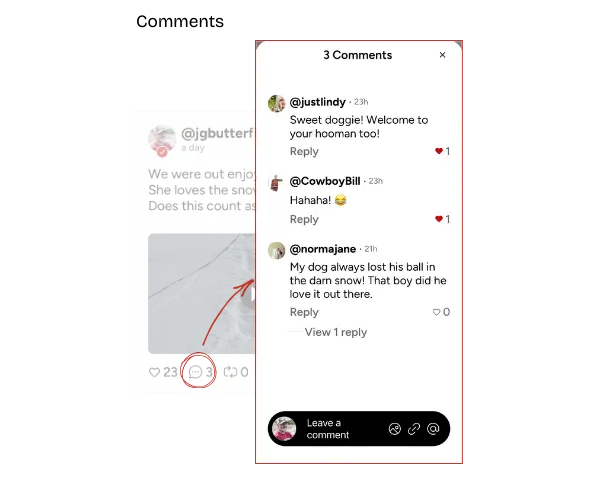
Comments & Conversation Threads
Tapping the comment icon opens the full conversation view and replies to replies.
Here you can:
- Read replies
- Reply directly to others
- Like individual comments
- View threaded responses
A few norms worth reinforcing:
- Add value before reacting.
- Ask questions rather than escalate.
- Avoid dogpiling.
- Keep disagreements focused on ideas, not people.
Healthy comment sections are what separate community platforms from noise platforms. We have enough vitriol on other platforms. Let’s make this a sharing space and have good discussions. Pretend you’re at Tim’s having a coffee and chatting in person.
If you want to build reputation on Gander:
- Be the person who improves the thread.
- Not the one who inflames it.
Adding a Link (Web Preview Cards)
When composing a post, you can paste a URL directly into the text field or use the link icon. When you paste the link directly into the body of the post it counts towards your 300 characters, so keep that in mind. It also does not get processed through mediafactcheck.com and given a rating.
Once added, Gander generates a preview card, showing:
- Source name
- Headline
- Thumbnail (if available)
- Context tags (where applicable) and if they have a profile on mediafactcheck.com
A few best practices:
- Add a short explanation above the link, don’t just drop URLs.
- Provide context, add some commentary as to why you’re sharing it.
- Be mindful of source credibility(especially if the tags indicate it’s low)..
A link without commentary is noise. A link with context becomes contribution.
Mentions (@ Tagging Other Users)
Using the @ icon while drafting opens the mention menu. From there you can search and select accounts to tag.
Mentions are powerful. Use them intentionally.
You might tag someone to:
- Credit original content
- Invite them into a discussion
- Ask a direct question
- Acknowledge contribution
Avoid:
- Excessive tagging
- Dragging users into arguments
- Using mentions purely for attention
Mentions should feel like an invitation, not a summons.
Used properly, they strengthen conversation threads and community visibility.

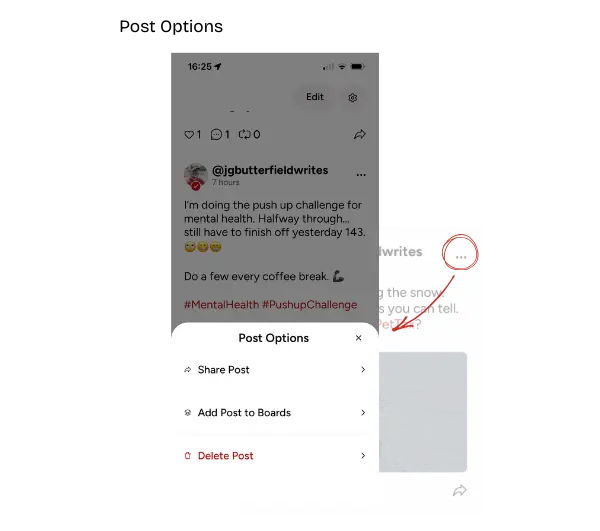
Post Options (The Three-Dot Menu)
The three-dot menu on your post opens management options such as:
- Share Post: Distribute or repost
- Add Post to Boards: Organize content (if using boards)
- Delete Post: Permanently remove it
This is your control centre after publishing.
Important mindset notes:
- Deleting a post is available, but use it thoughtfully.
- Editing (if available) is preferable to deleting for minor corrections.
- Share options help amplify discussion intentionally.
Publishing isn’t the end of the process, managing your content is part of responsible participation.
Boards: Organising Your Content with Intention
Boards allow you to group related posts into themed collections. Think of them as curated shelves inside your profile.
Instead of everything living in one feed, Boards let you organise by topic, project, or purpose.
Creating and Adding to Boards
From your profile, you can tap Boards, then choose:
- Add a board
- Create New Board
- Or select an existing board to add a post
When creating a board, give it a clear, descriptive name. For example:
- “My Books”
- “How To”
- “Policy Flocks”
- “Training Notes”
Clarity helps others navigate your content later (I think, still unknown whether boards will be exposable to other or personal curation and ways to save posts in theme folders).
Once created, you can add posts to that board from the post options menu. This allows you to:
- Build themed collections
- Keep long-running projects organised
- Separate personal posts from professional ones
- Curate resources intentionally
They turn scattered posts into structured archives for you to return to at a later time..

Managing Boards (Remove, Rename, Delete)
From the post options menu, you can (from the ellipse in the upper right of the post):
- Add Post to Boards
- Remove Post from a Board
This gives you flexibility. Organisation isn’t permanent, you can adjust as your content evolves.
From Board Settings, you can:
- Rename a board
- Delete a board (permanent action)
Deleting a board removes the collection structure, but it does not necessarily delete the posts themselves unless explicitly chosen (or some bug).
A few practical reminders:
- Rename instead of delete if you’re just refining focus.
- Avoid creating too many boards early, start simple.
- Use consistent naming conventions.
Boards work best when they reflect clear themes, not vague categories.

Flicks: Short-Form Video (15 Seconds to 3 Minutes)
Flicks allow you to post short videos ranging from 15 seconds up to 3 minutes.
They’re ideal for:
- Quick updates
- Commentary clips
- Behind-the-scenes moments
- Book or project teasers
- Training highlights
- Community events
- Visual storytelling
Think “intentional short video,” not algorithm-chasing performance content( ‘cause there ain’t no algorithm).
Adding a Flick
When creating a post, you can switch from Post to Flick at the top of the composer.
From there you can:
- Add a video from your device
- Write a caption
- Tag accounts
- Add links (where relevant)
Once published, your Flick appears in the vertical video feed format. And also as a regular post in your feed. It’s immersive, but still connected to your profile.
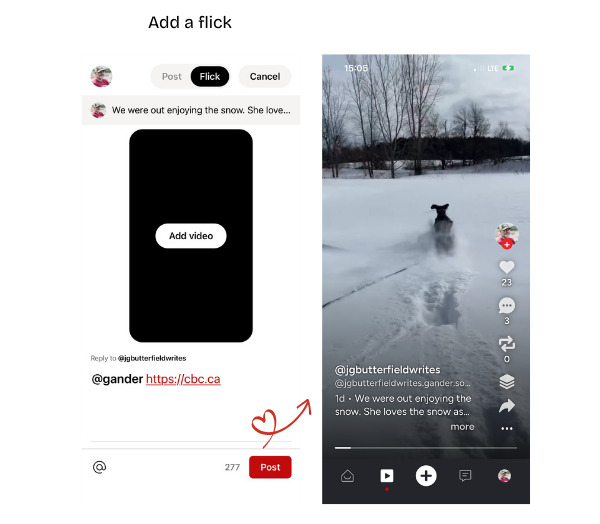
Engagement on Flicks
On the right side of the video interface, users can:
- Like
- Comment
- Share
- Add to a board
Gander is still early. Still in BETA, it’s an opportunity for us to help give it a little push.
On mature platforms, culture is inherited. Here, it’s shaped. Every post, every reply, every board you create helps define what this place becomes. If you show up with clarity, good faith, and a bit of intention, you won’t just use the platform, you’ll help build it. And if you find a bug and report it, all the better.
This guide isn’t official. It’s community-driven. Add to it (send me a message on Gander – @jgbutterfieldwrites). Improve it. Share what you learn.
Platforms don’t stay healthy by accident.
They stay healthy because the flock decides they matter. 🪿 Lets make this one matter.